Preparation for Presentation
Download applications
The application for any OS may be downloaded at cerebrohq.com
For mobile devices:
- iOS: Cerebro Mobile iOS
- Android: Cerebro Mobile Android
Installation
To install, launch the executable file and follow the instructions on the installer. After installation, launch the Cerebro app. You will be prompted to log in. You can use the usernames provided below.
Documentation and Technical Support
Detailed documentation for Cerebro and Mirada is available here: https://cerebrohq.com/docs/en/manual.html
24/7 Support:
- LiveChat at https://cerebrohq.com
- Email: support@cerebrohq.com
- Support Portal: https://support.cerebrohq.com/hc/en-us
- Phone:
- USA: +1(415)3490057
- Russia: +7(499)1103482
Usernames and Passwords for Demo
Passwords for different user roles are provided below. When you log in, you will be prompted to select a server for Cerebro. To make Cerebro work faster, select the server closest to you.
| Role | Login | Password |
|---|---|---|
| Design & Marketing: | ||
| Designer | designer@cerebrohq.com | des3 |
| Copywriter | copywriter@cerebrohq.com | cpw3 |
| Creative Director | creativedirector@cerebrohq.com | cdir3 |
| Client | client@cerebrohq.com | client3 |
| Construction: | ||
| Engineer | engineer@cerebrohq.com | eng3 |
| Foreman | prorab@cerebrohq.com | pro3 |
| Project Chief Architect | architect@cerebrohq.com | arc3 |
| Project Chief Engineer | superengineer@cerebrohq.com | seng3 |
| Project Manager | projectmanager@cerebrohq.com | pman3 |
| Animation: | ||
| Animator | anim_animator@example.com | anim3 |
| Director of Animation | anim_director@example.com | adir3 |
| Producer | anim_producer@example.com | aprod3 |
| VFX: | ||
| CG Artist | demo_cgartist@example.com | cga3 |
| VFX Supervisor | demo_vfxsuper@example.com | vsuper3 |
| VFX Producer | demo_vfxprod@example.com | vprod3 |
| VFX Client | vfx_client@example.com | vclient3 |
Copying a Project
Demo projects have read-only access. You can view project content, but you cannot create new tasks or messages.
To demonstrate a full-featured project, you can create your own project based on the demo project.
To do this, complete the following steps:
- In the main Cerebro window – Main Menu – Tools – Administrator…
- In the “Administrator” window, Projects tab.
- Press the “New Project” button under the list of projects.
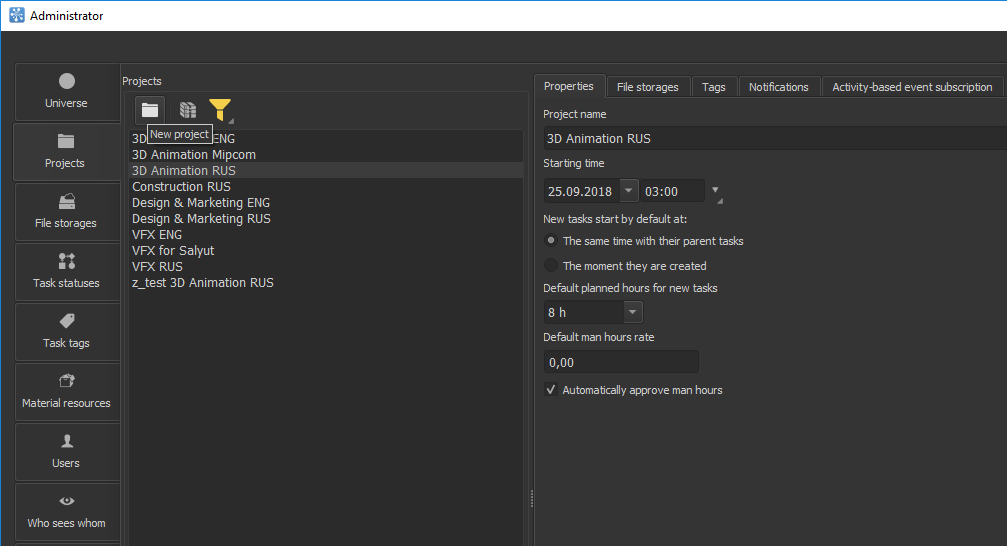
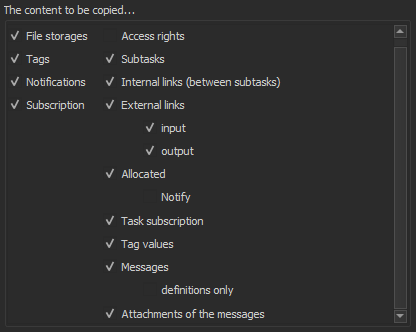
- In the project creation window, enter the “Project Name” and select “Use a Template”. In the template’s Copy Options, choose all items except: “Access Rights”, “Notify”, and “definitions only”. Press the “Finish” button.

- The project will be created. It will be available for editing in the Navigator on the main Cerebro window.
Attention
To avoid cluttering the demo universe, all projects created will be deleted on the first of every month. However, the demo projects will remain, and you will be able to create new projects based on the demo projects.
After creating a copy of the demo project, your new project will be available for editing. You will be able to create tasks, messages, etc.
Cerebro Presentation
General Description of Cerebro
Cerebro is a project management system for producing media content. In addition to standard project management features, our system also has several aspects geared toward working with media files, including a built-in subsystem for storing and transferring files, project messaging, email notifications, etc.
The Cerebro system is built on client-server architecture. There are several server components (database, file storage, mailing lists) that are available both in the cloud and on a local server within a company. There is also a client application for PC, and mobile versions for iOS and Android. The distribution package can be obtained from the Downloads section of our site cerebrohq.com.
Show the download page in the browser.
Each user has an individual account. The number of these accounts is limited by the licenses purchased for a company, but the number of installations on different computers and devices is unlimited.
Getting Started
Launch Cerebro, enter the username/password to log in as, for example, the director of animation.
To log into Cerebro, you will need to enter your username and password. You will be greeted by the program’s main window, which is divided into two areas by a slider. On the left side, you will find tabs with the task structure, allowing you to create, search, and manage tasks. On the right, you will see different data related to the selected task.
Show left and right tabs with the mouse. Enable the Navigator on the left and the Forum on the right.
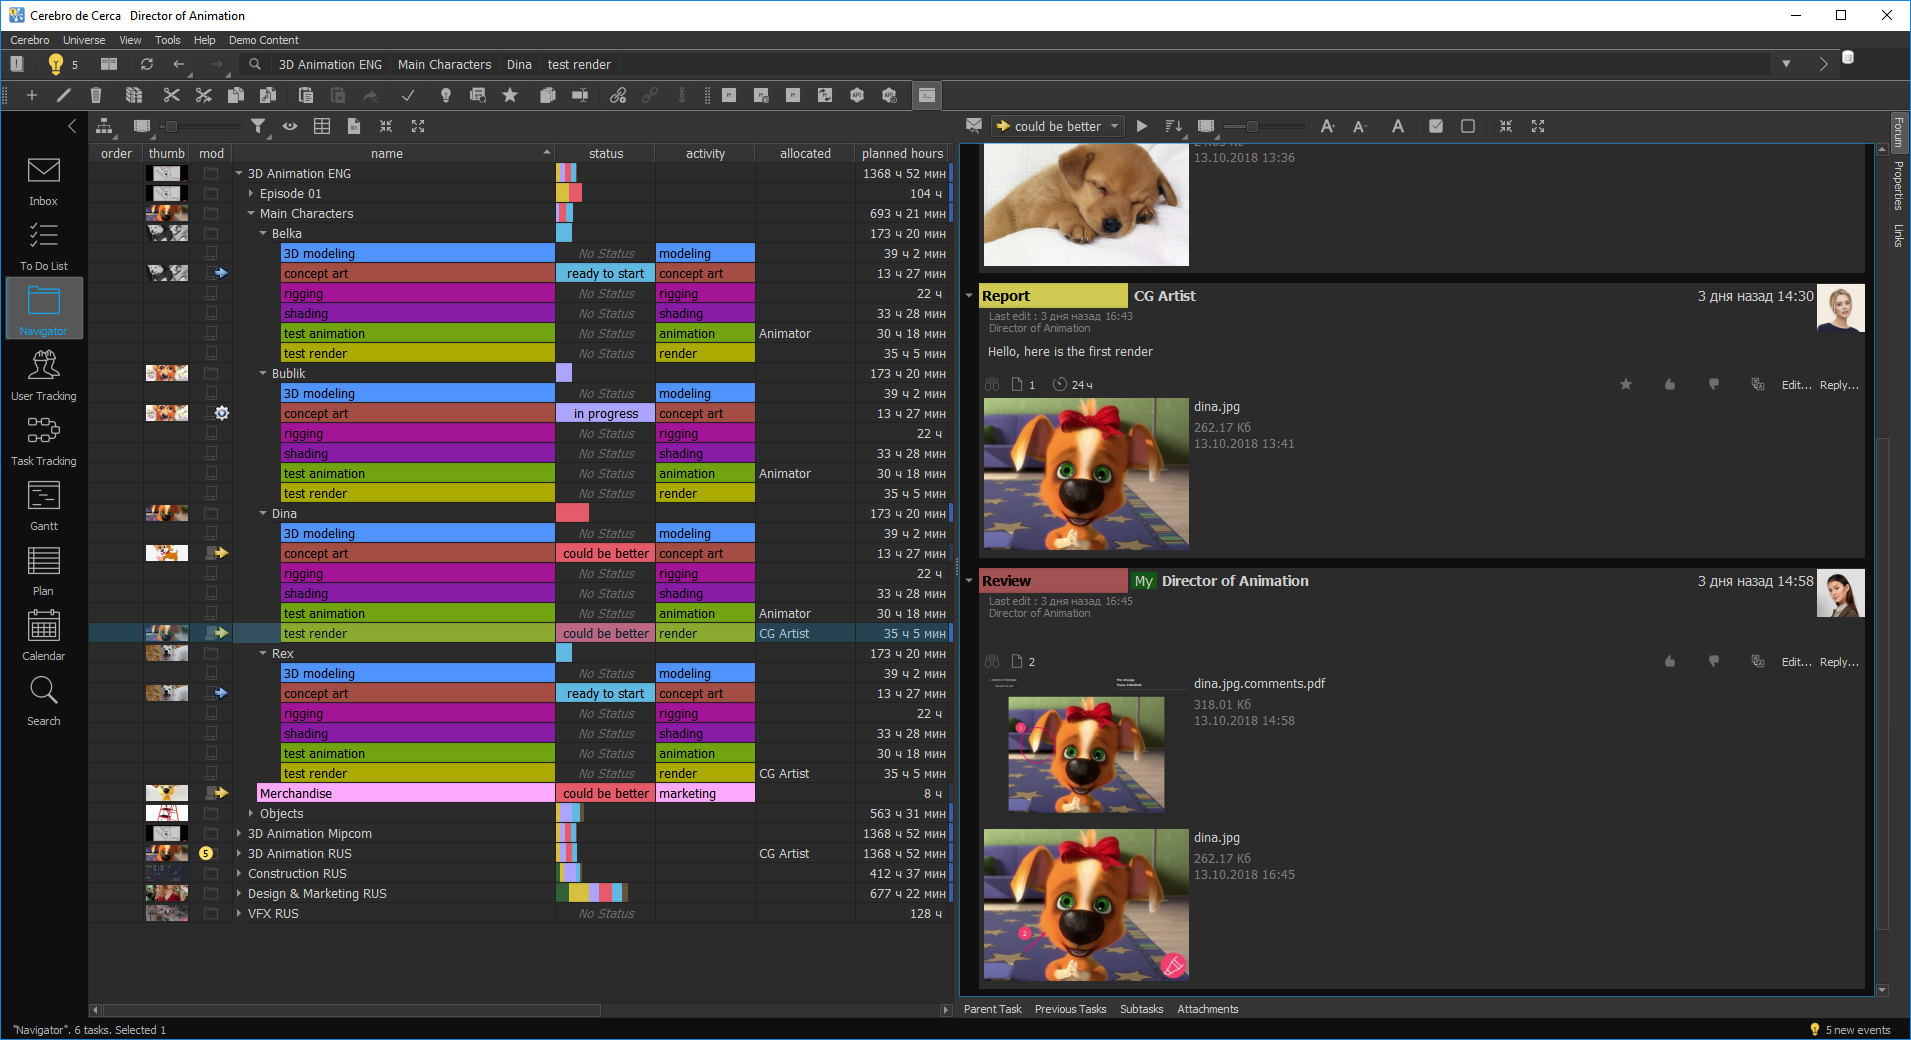
The main window on the left is the Navigator. The tasks here form a hierarchical structure, where the project is usually the root of the tree. The root branches off into big tasks, which in turn branch into subtasks, and so on. There is no limit to the number of nested levels.
Expand the demo project and show its task tree.
Planning Tools
Let’s consider Cerebro’s features for a project supervisor: creating task structures, scheduling, and assigning contributors.
A project’s task structure may, in theory, take any form, depending on the company’s type of work, the type of project, etc. Within a project, subtask structures are often repeated, such as when working on a shot in an animation or VFX project, where work typically occurs in a certain sequence. These tasks typically link together in a chain to ensure that they follow one another, and this structure is repeated many times within a project.
Show the task structure within character models for an animation project.
To create common task structures, you can make templates that already have links between subtasks and configurable attributes. Then you can quickly create structures in new projects based on this model.
The supervisor has access to several functions: copy, move, duplicate, delete tasks, etc.
Right-click with the mouse on a project to show copy, paste, and duplicate commands in the context menu.
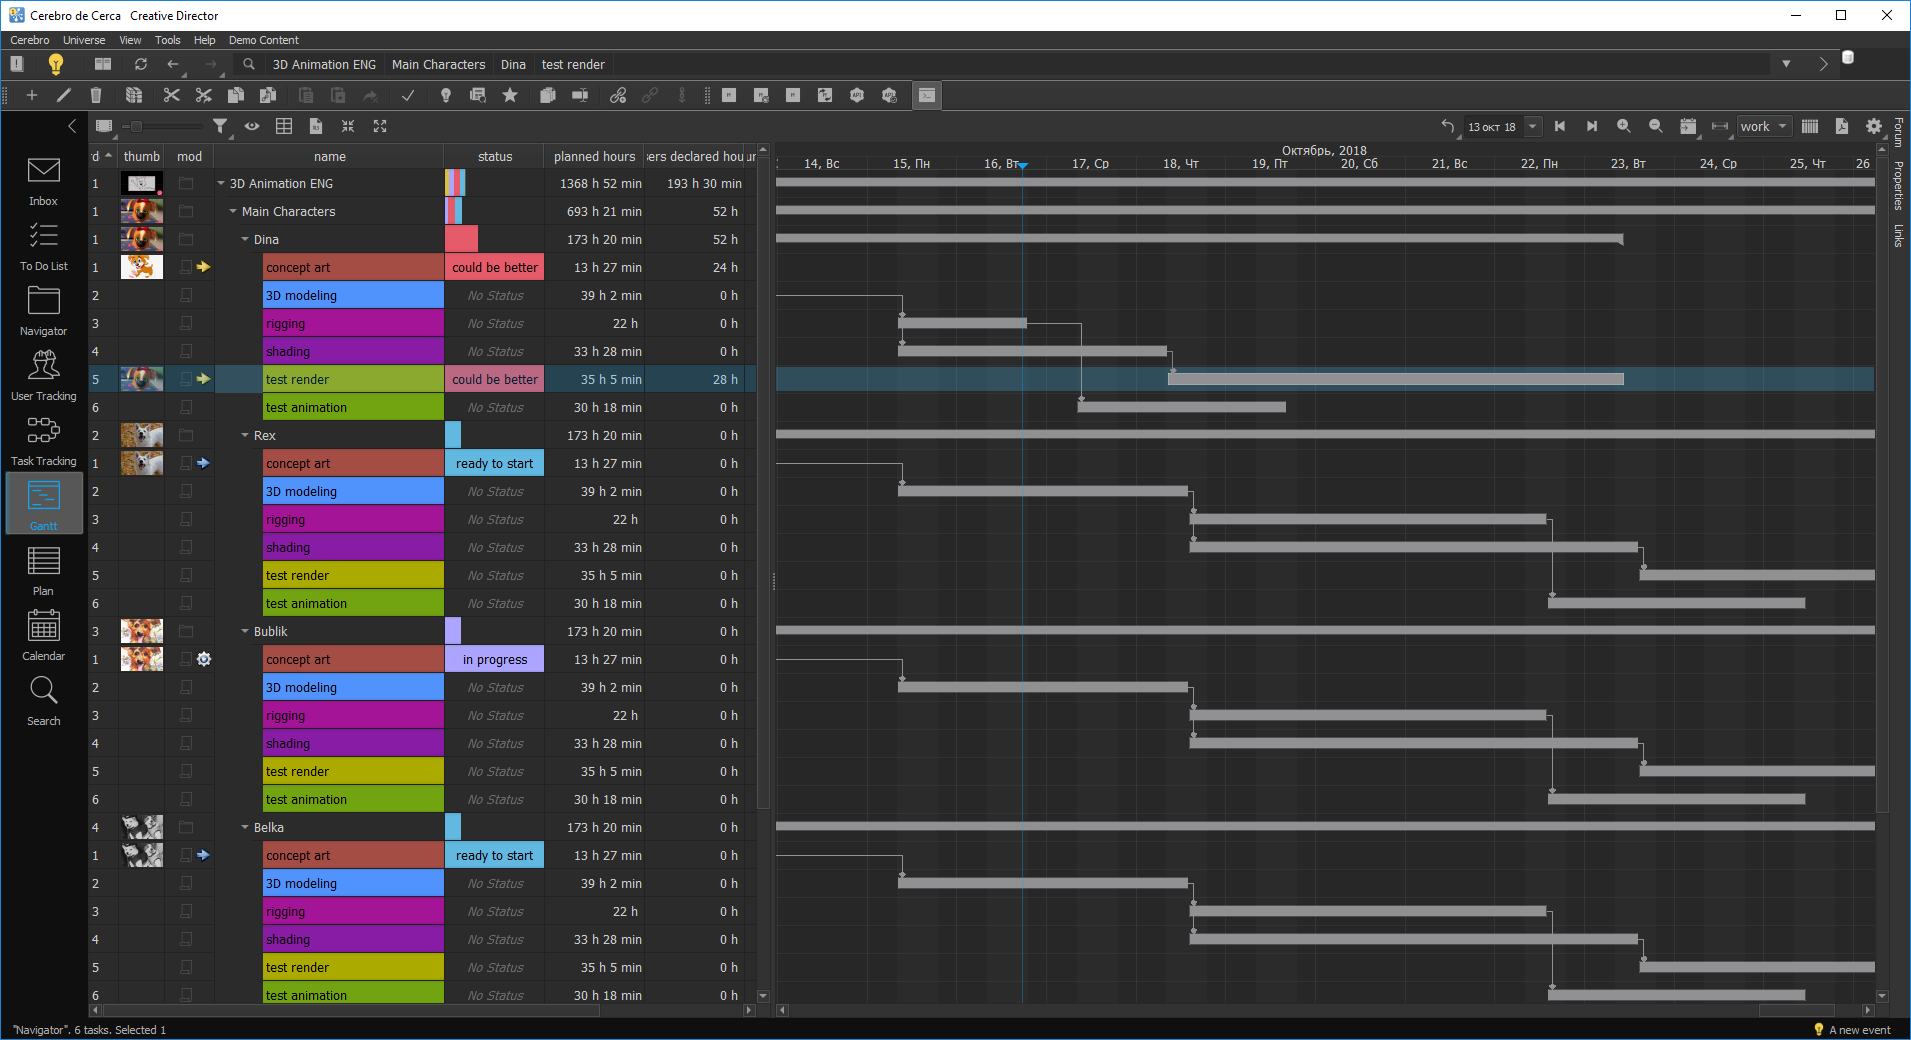
On the Gantt chart tab, you can see the project tasks on a timeline. It shows the task structure and the links between tasks. You can use the mouse to move tasks and change their duration, upon which the system will automatically shift subordinate tasks in time.
Proceed to Gantt chart tab. Show tasks and connections, and move one of them.
Forum Communications
Next, let’s look at an example of written messages within an individual task.
Each task (at any nesting level, including the project’s root) has a message feed or forum connected with it. It is displayed on the right side of the main Cerebro window on the Forum tab. This is where communication happens while a task is being performed. Text and file attachments may be posted. Various message types are supported: problem statements, contributor reports, supervisor or client reviews, or just notes.
Show that tasks at different levels have a forum.
The basic procedure that every employee performs daily in Cerebro involves finding the necessary task in some way, reading its forum, and writing a message (and possibly attaching a file to it).
Select a task in the second-to-last level to create a new subtask.
When the supervisor creates a new task, the first message in its forum will immediately be created: the problem statement.
Press the create new task button to make, for example, a test render task within the character model.
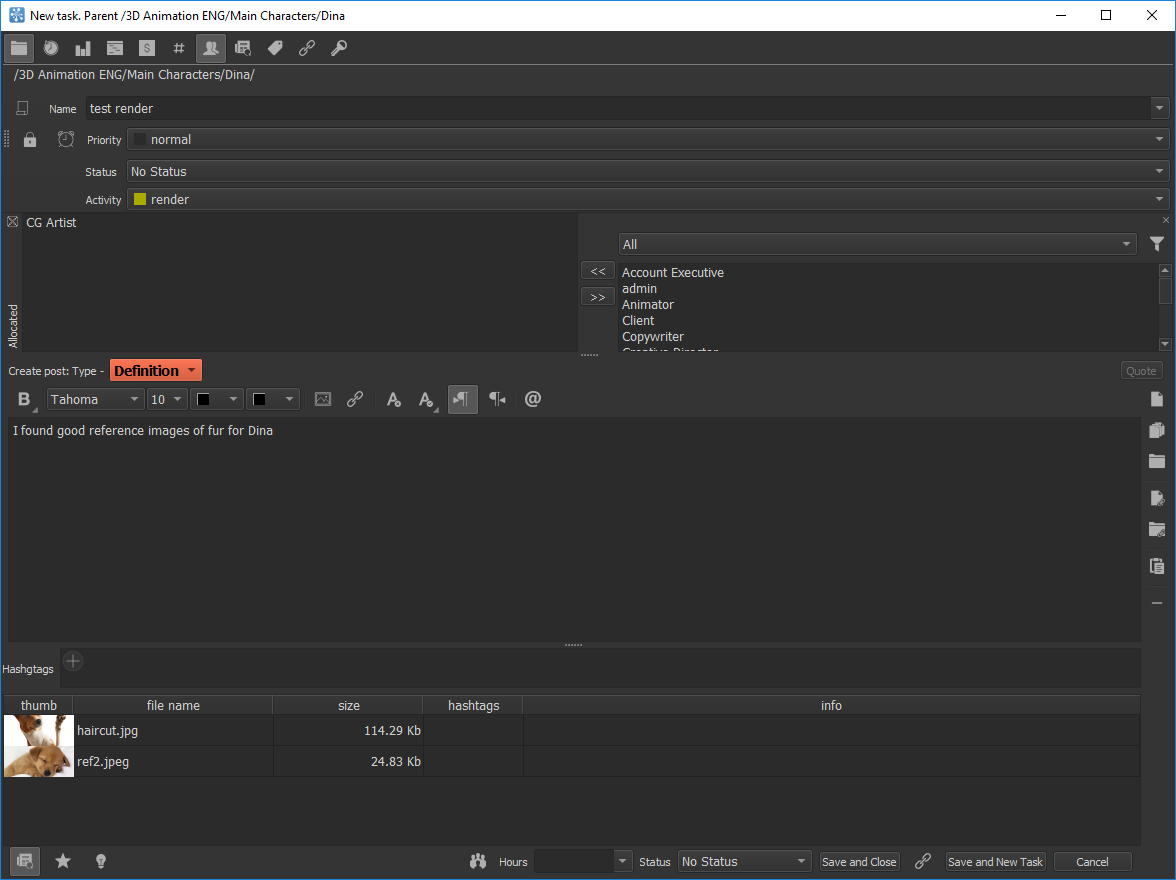
Show the area for editing text and attaching files. Attach some file (a picture or movie) as an example.
In the message editor, you can write text and attach one or more files to it, as well as provide a link to a publicly available file or catalog. You can do this either with the buttons on the toolbar or by dragging files with the mouse into the editor window.
assign someone as a contributor as well
A contributor assigned to a task will be sent an email notification and the system will alert them of the new event in every way possible: a light bulb on the toolbar, a pop-up message, bold font, etc.
Create a task, go to the “To Do” window, and add the user who was assigned to the task.
Normal employees (not supervisors) can use the “To Do” window instead of searching for their tasks in the Navigator tree. This window displays all of the tasks for which a user has been assigned as a contributor.
Cerebro supports a system for changing a task’s status based on a user’s access level. For example, by default, tasks are created with the status No Status, and to assign the task to a contributor, the supervisor switches its status to ready to start (employees cannot do this themselves).
switch task status to “ready to start”
When beginning a task, the contributor switches its status to in progress.
switch task status to “in progress”
Once the necessary work is completed, the contributor should write a report in Cerebro. To do so, they will again go to the task forum and press Reply. They should write a different type of message – a “report” – which will consist of text that describes the completed work and a file, the results of the work.
write a new report with some text and attach a file

The report must indicate the amount of time spent on the work: this is used to calculate the actual time spent on a task and collect statistics for the project and for the individual contributor. It also makes sense to switch the task’s status to pending review, as this alerts the supervisor that it’s time to assess the completed work.
indicate the time in the report, change the status
After receiving a new message notification, the supervisor then goes to the task that is waiting for review. They examine the report and the attached file and write a message of the “review” type in response. You can simply answer in text format on the forum or create an audiovisual review of the media file that was attached by the contributor. In the latter case, you need to open the file using the built-in viewer, Mirada.
hover over the file in the report and open Mirada with the button on the right
Mirada Utility
Mirada is a special utility included as part of Cerebro. It combines several functions: viewing images, playing videos, and creating audiovisual reviews.
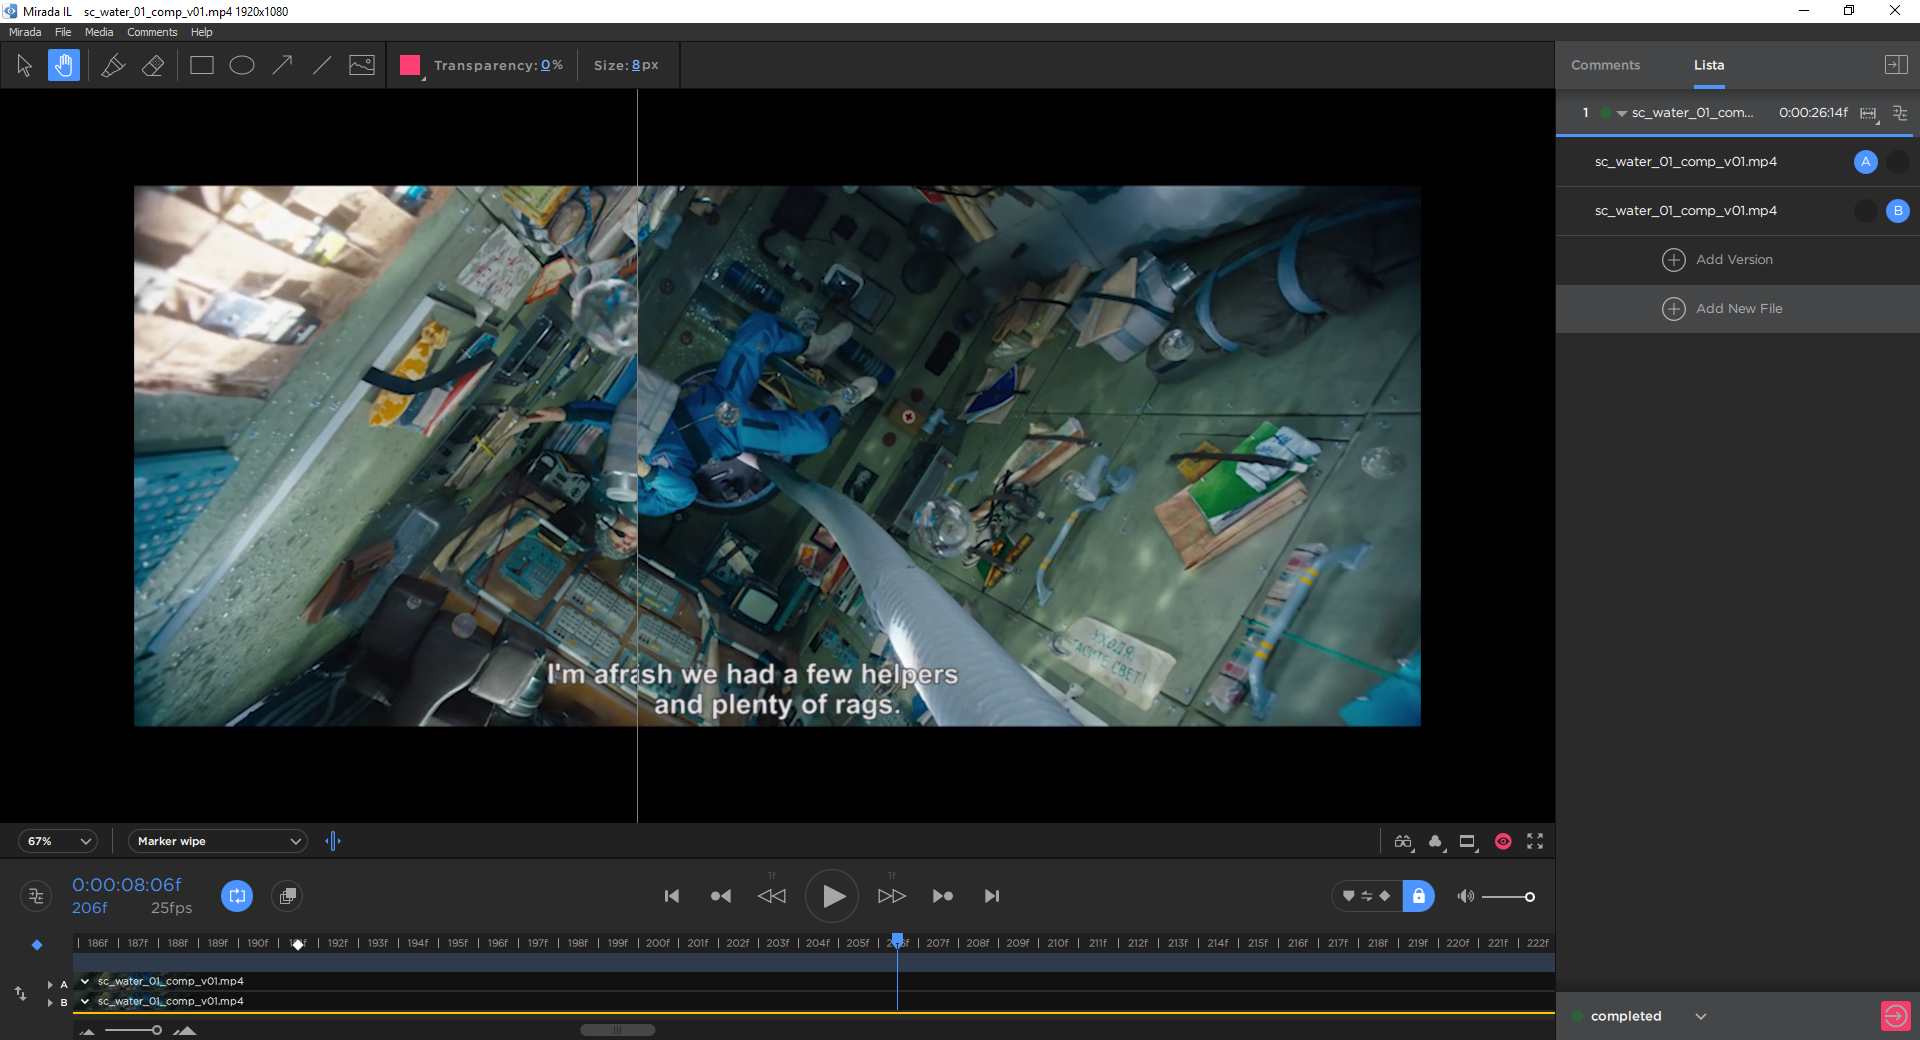
The file opens in the Mirada window. There is a playback panel toward the bottom with standard controls.

You can play a video or view an image or multi-page document, like a PDF.
demonstrate video playback
Besides viewing one image, you can enable two-frame comparison mode, with two available options: comparing frames within one file using a marker on the timeline, or comparing two different versions of a media file. In the latter case, you need to load both versions from Cerebro to Mirada.
enable comparison with the marker, move the marker a few frames to the right
In both cases, there are three options for comparing images:
- horizontal arrangement of frames;
- vertical arrangement of frames;
- comparison in “curtain” mode, where frames are superimposed over one another and vertical “curtains” appear in the viewing window that can be moved using the mouse; this allows you to create a pixel-by-pixel comparison of the images.
show the three modes of comparison with the marker
Another viewing mode in Mirada is meant specifically for panoramic images and videos. To begin, these media files must be loaded from Cerebro as usual, and then 360 View mode must be activated using the drop-down list on the toolbar under the viewing window. In this mode, you can start video playback and control the viewing direction using the Pan tool.
show the button that enables 360-degree viewing mode
Mirada can also handle graphics and video files that contain a stereoscopic image (an anaglyph image and viewing with shutter glasses).
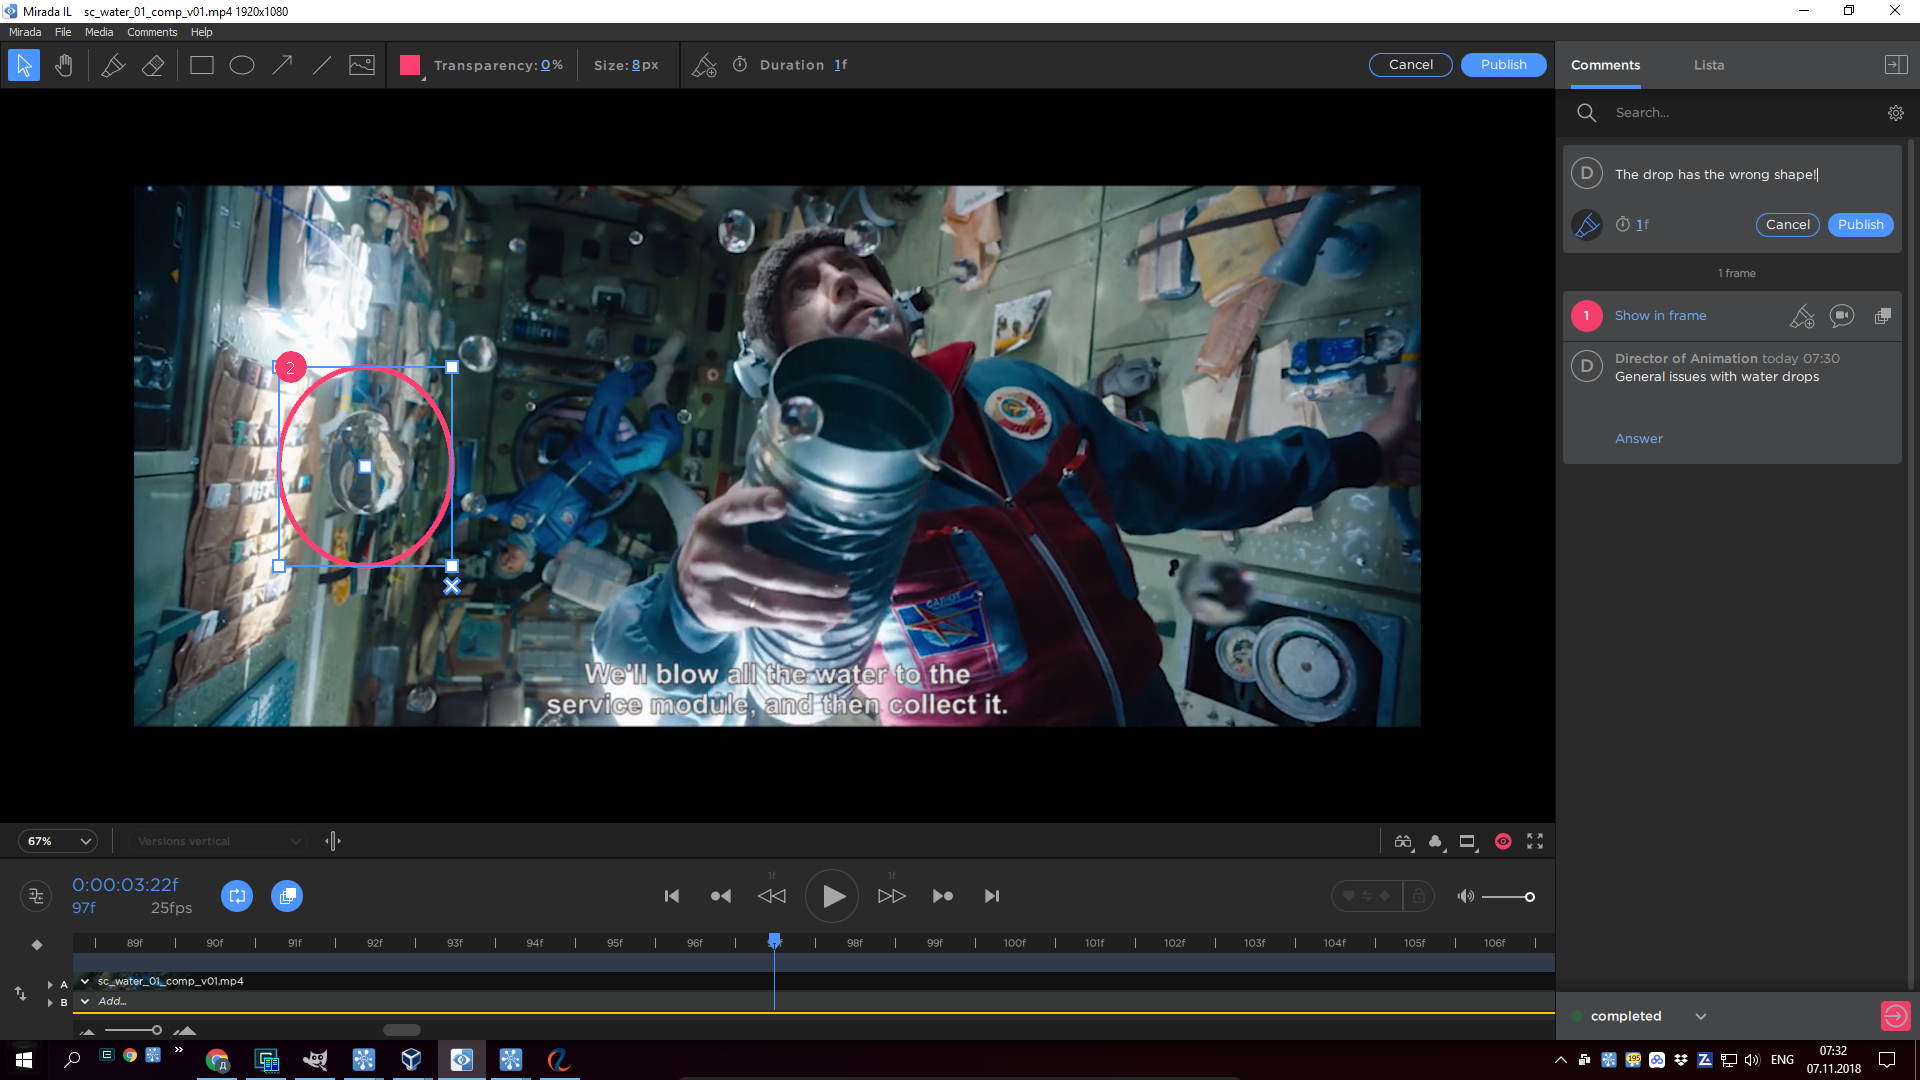
Reviewing in Mirada
A review of a media file in Mirada includes a set of comments that can each contain text and drawings or a voice track, as well as a message feed of replies to a comment from different users.
Comments are displayed in list format in the Comments tab on the right side of the Mirada window. Each of them is linked to a frame of the media file, and this frame has a label with the comment number.
There are four options for making a comment.
create a text comment in the “Comments” window
A plain text comment contains only a message in text format without drawings or a voice track.
A comment with drawings is created using the drawing tools. They are located on the panel at the top of the viewing window: there is a marker and eraser for drawing, geometric shapes (rectangle, ellipse, line, arrow), and a button for adding an image from a file on the drive.
draw something with the marker and a couple of geometric shapes
You can draw both inside and outside the frame, and there is a button below the viewing window to hide/show drawings on top of the original image.
post a comment
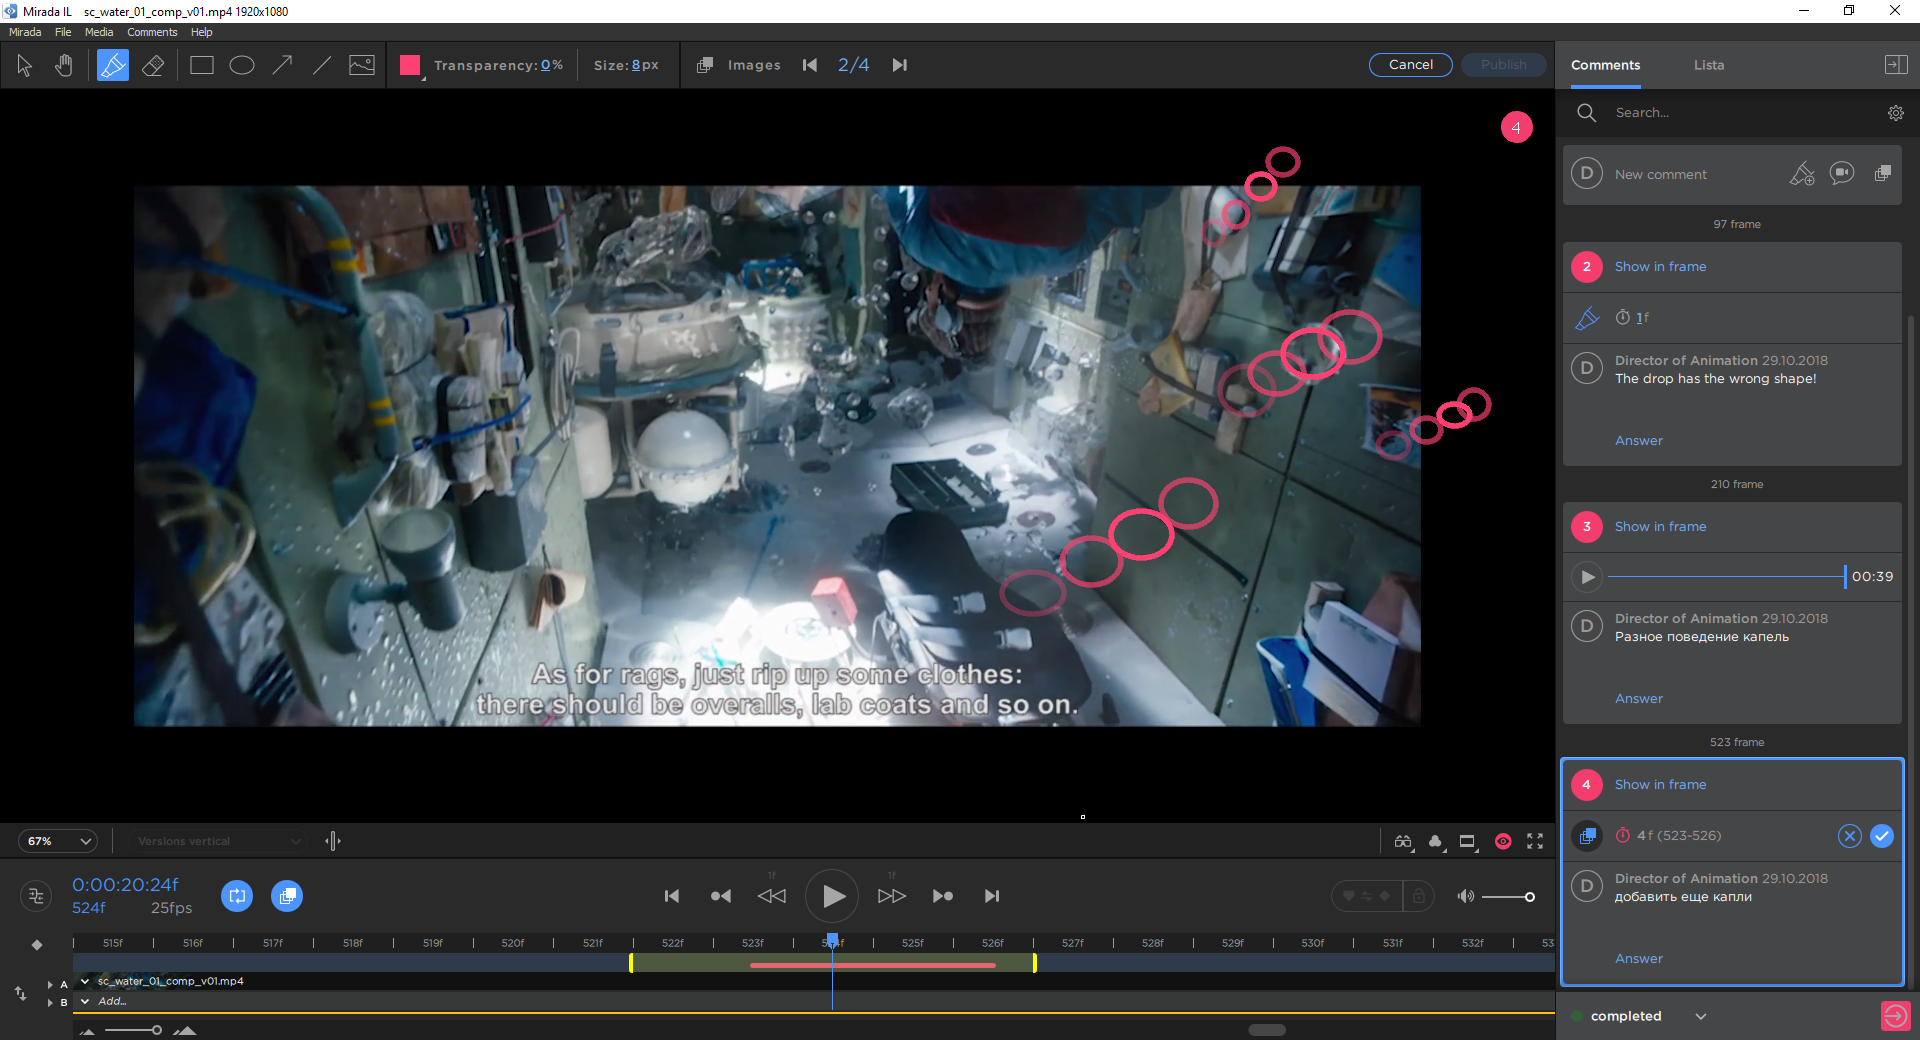
In general, there can be an unlimited number of comments linked to the same frame. However, only one active comment chosen from the list is shown in the viewing window at a time. Drawings from inactive comments on the same frame are not visible, but their shaded number labels are visible. By clicking on these labels, you can switch between them, which will highlight the comment text in place of the label. You can also just select a comment from the list on the right panel.
show comment selection with the label and from the list
The third type of comment in Mirada is a video comment. This contains a recording of a voice track and the commenter’s on-screen actions. To start recording a new track, you need to press the corresponding button in the new comment box.
start recording video comment, move the cursor in the window, zoom, pan, and move around on the timeline
During recoding, the new comment box displays the duration of the track and the stop button. You can simultaneously record spoken observations about the media file and on-screen actions, including the movement of the cursor with the mouse (for example, you can draw with the marker), zooming and panning, and movements along the timeline.
stop recording, post the comment
After a video comment is posted, it will appear in the Comments list with a button for playing the recorded track. You can click on it right away to see how it turned out.
The fourth type of comment is an onion comment. It is created in “onion-skin” mode, which is a series of drawings over multiple frames in a row. In other words, it provides the ability to create an animated image within a single comment.
create an onion comment, set the range of frames, and draw an object in a few positions, such as arrows in 4-5 frames in a row
First, you need to move along the timeline to the frame of the media file where the series of images should begin. Then press the Create Onion Comment button. This will enable onion-skin mode, which will display drawings not only in the current frame of the media file, but also in neighboring frames. The range of neighboring frames is displayed on the timeline and may be changed using the mouse.
For example, if you want to draw a moving object across a series of frames, you will create the first image in the starting frame. Then, draw the subsequent positions of the object in the following frames one by one, basing each new drawing on the images that are visible from the previous frames.
post a comment
Once the comment is posted, it will occupy multiple frames on the timeline and contain the animated image.
There is a status switch at the bottom of the Mirada window. It may be used to assign a new task status after the review is sent to Cerebro.
change the status to “could be better”, close Mirada
Once Mirada is closed, the review you created will automatically be sent to Cerebro and become available to other users.
The task contributor receives a notification that there is a new message in the forum, goes to it, examines the review that was posted, and can work on the task again to make corrections.
Connectors
If connectors are set up to run a program like Maya
In addition to installing the client program Cerebro, you can configure special plugins that serve as connectors between Cerebro and graphics applications used in the production of media content (these may include Maya, Photoshop, Nuke, and several other supported programs). Once you do this, much of the communication on the contributor’s end can take place directly from the graphics application, without going to Cerebro.
show Cerebro menu item, open the task list
After you set up the connectors in the graphics application, the menu item Cerebro will appear, allowing you to open your personal task list, load a file from it to work on, and write a report upon its completion. In other words, you can do all the same actions that we saw earlier without looking at the Cerebro application.
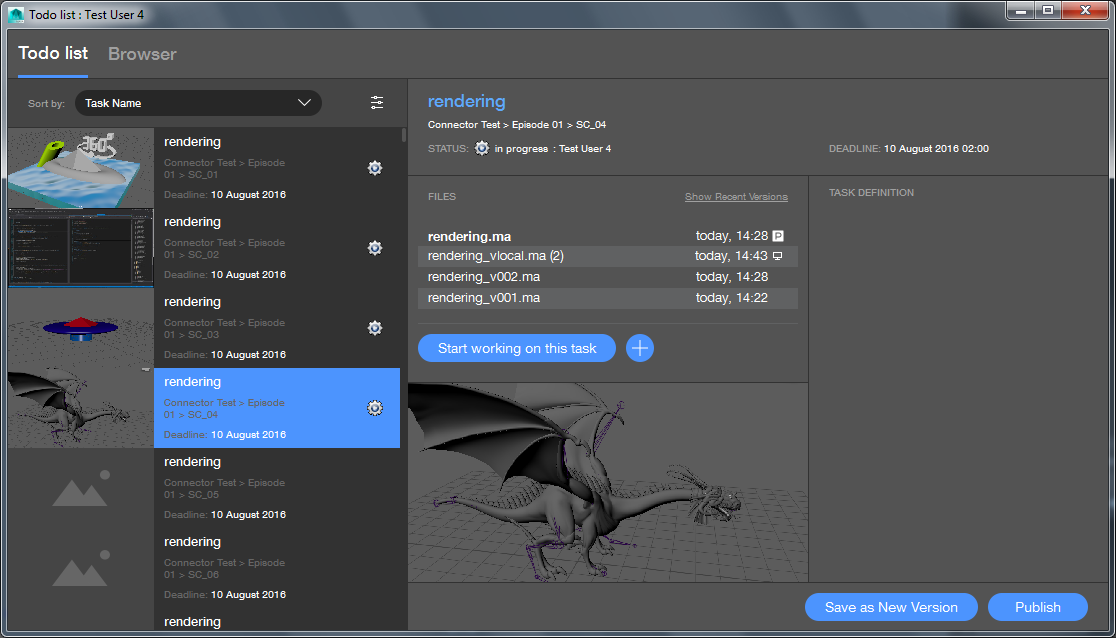
show task in the list and the button for importing and posting
Furthermore, connectors automatically make sure that posted files are located in the correct directories and named with the file version.
From the supervisor’s point of view, everything is still the same as before: they log in to Cerebro, examine the report, write a review, and change the task status.
return to Cerebro
In the course of completing the task, this iteration may be repeated several times: an employee receives an assignment, completes it, and writes a report, and then the supervisor creates a review and returns the work to be revised.
Work on the task is finished when the supervisor writes a review saying that everything is good and switches the task to “completed” status.
switch task status to “completed”
Monitoring Tools
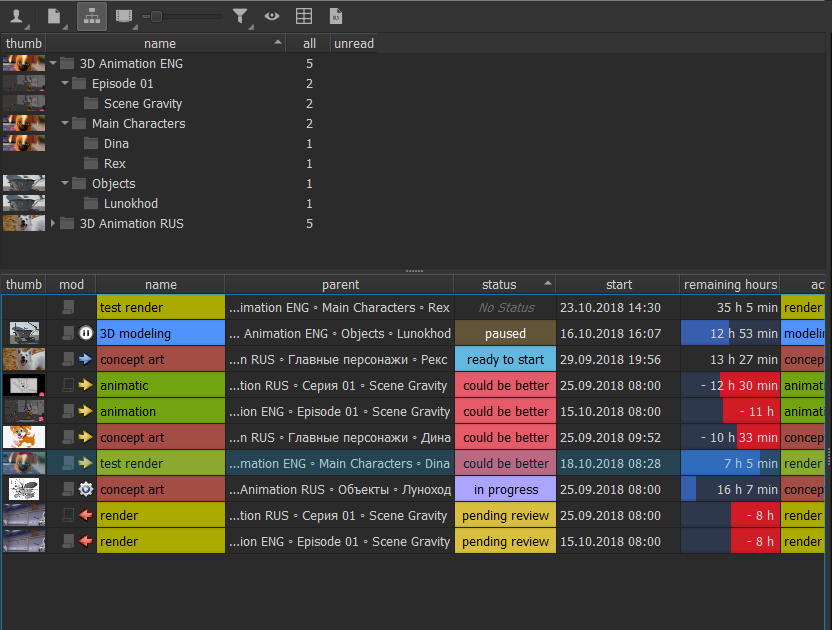
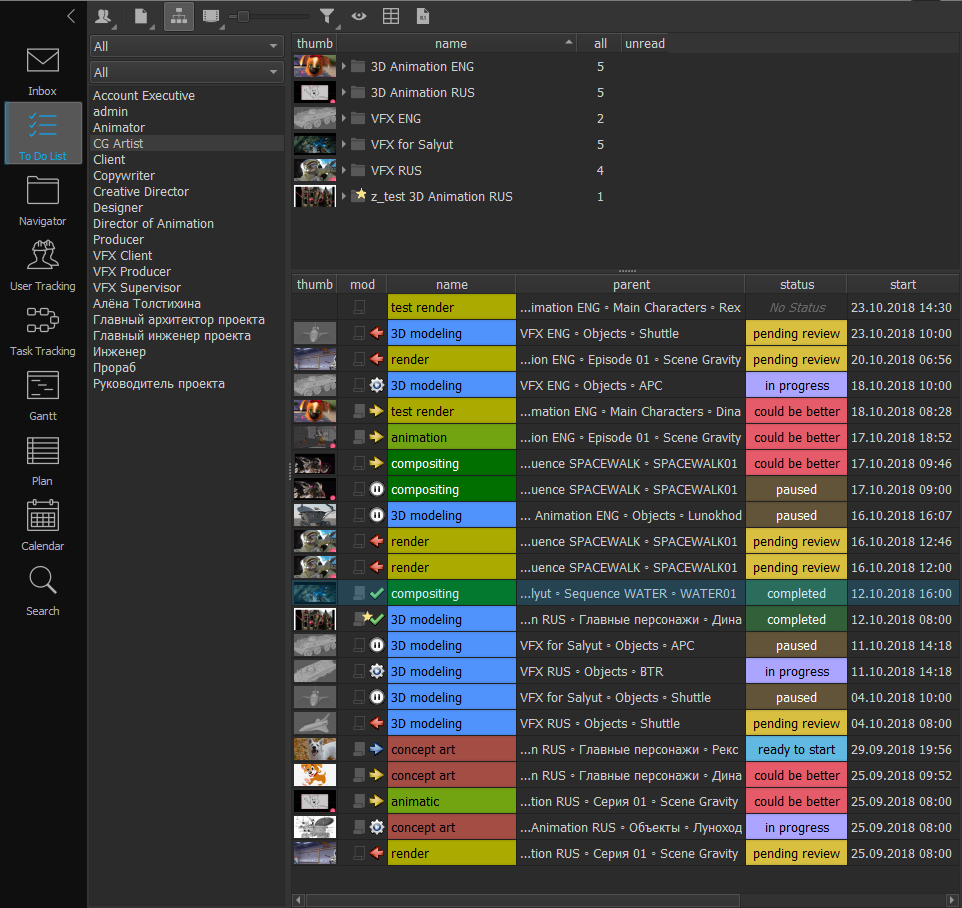
go to the “To Do” window, show the tasks for different users
The “To Do” list displays all the tasks that the current user is assigned to as a contributor. The default view shows only the tasks for the current user who is logged in to the system, but if you have sufficient permissions, you can switch to view the lists of other users. This allows you to monitor how many tasks each person has, what the status of those tasks is, etc.
go to the “Planning” window, show the tasks for different users on the chart
You can also use the chart on the Planning tab to monitor contributors’ workloads. Here on the left is the list of people, while on the right is a chart of the tasks assigned to them with color indicators that show when the contributors have too many or too few tasks.

go to the “Availability” window, first show availability with the status “in progress,” and then switch to the status “pending review”
The Availability window is usually used to see who is working on what for the current day. It displays tasks that each user has set to “in progress” status. However, if you change the task status that is being monitored, this tab can also be used for other purposes, such as seeing which users have tasks that are switched to “pending review.”
go to the “Task Tracking” window, choose a top-level task in the animation project, and show the matrix display and tables at the bottom
The “Task Tracking” tab can display the status of tasks in a project branch with many subtasks or for an entire project as a whole in the form of a matrix. This feature is the most informative when there is a “correct” task structure with many similar subtasks that each have an identical set of steps inside them (as, for example, in animation projects).
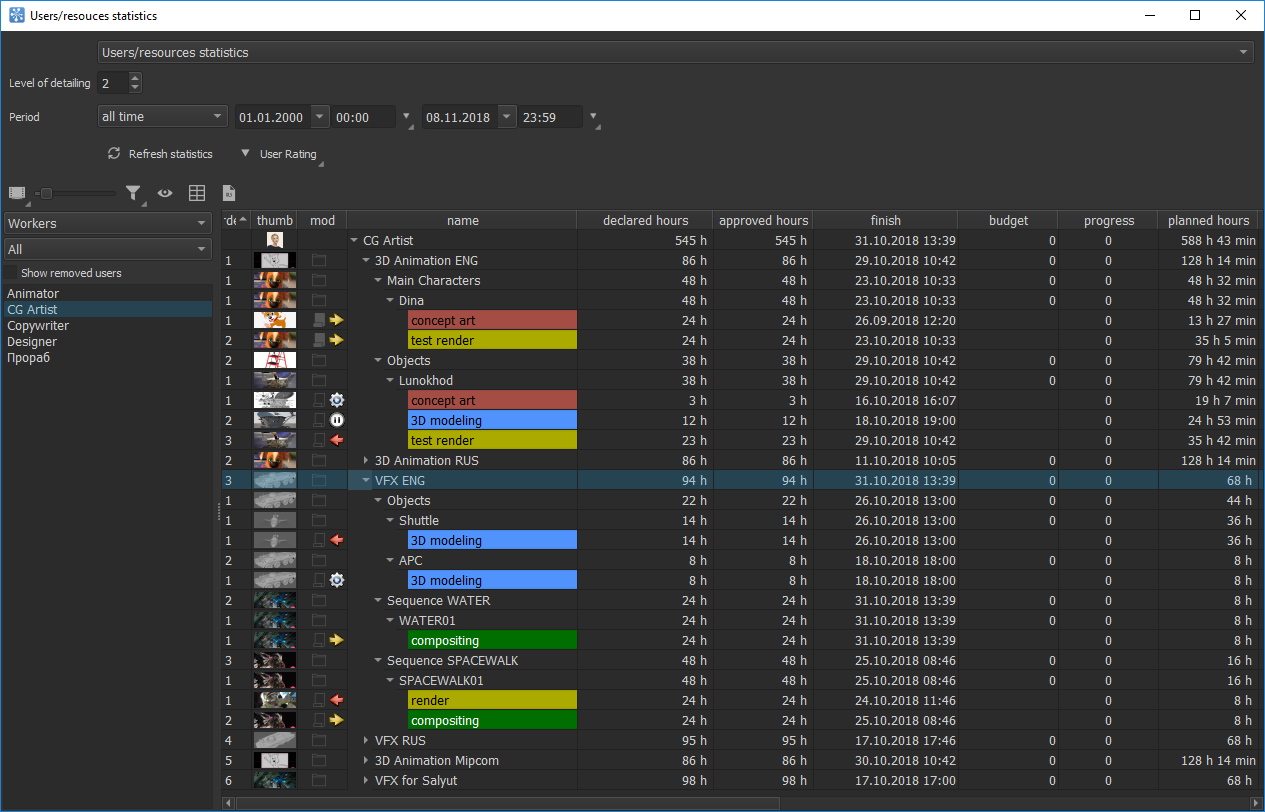
Cerebro offers two tools for gathering statistics after long-term work on a project based on actual contributor reports.
enable project statistics, select a project, and show statistics for the last month
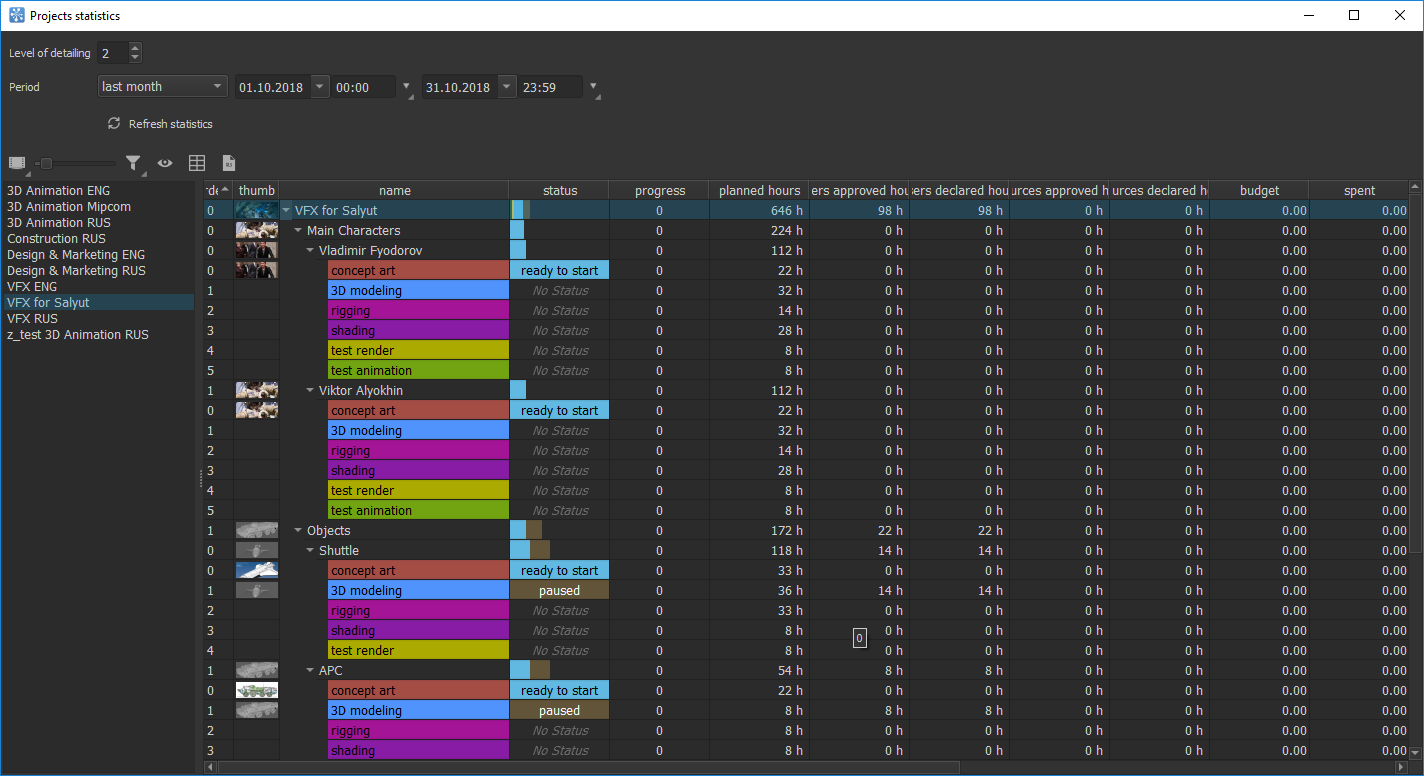
One mode displays statistics by project, showing resources expended on particular branches and subtasks. The other mode shows statistics in terms of contributors: how much time a person spent on which tasks over a month, for example. Both options for statistics may be exported to a spreadsheet for further processing.
enable user statistics for a user to show statistics for the month, and show the button to export to Excel